Monday, July 30, 2012

Christmas in July Block 14-MJ and Co

Welcome to the Christmas in July Block-A-Thon! For those of you who are new to my blog, my name is Jen and I am so happy to have you here! I’m also excited to share my block with you and I hope you’ll enjoy making it as much as I did. I don’t know about you, but lately I have been seeing triangles everywhere and I absolutely love them. So, it only seemed right to make a block filled with triangles. Fair warning, these are on the small side, but please don’t let that stop you. You can do this! (If you have any questions along the way, please don’t hesitate to ask!)

 finished block 1 FQs

What you’ll need:
4 FQs of fabric, preferably including two prints and two solids, like these beauties Westminster Lifestyle Fabrics provided.
Cutting mat
Quilting ruler
Quilting rotary cutter
A walking foot is recommended, but not necessary

After determining your fabric placement, set aside your border and cut your remaining three fabrics into 2.5” strips. I’ll refer to them as A (inner star), B (outer star), and C (background).
You’ll need about 2.5” x 12” for fabrics A and B and two strips about 2.5” x 16” each for fabric C.
Feel free to cut your strips a little longer if you like, this is just what it took for me to comfortably cut my
triangles.

 strip angle

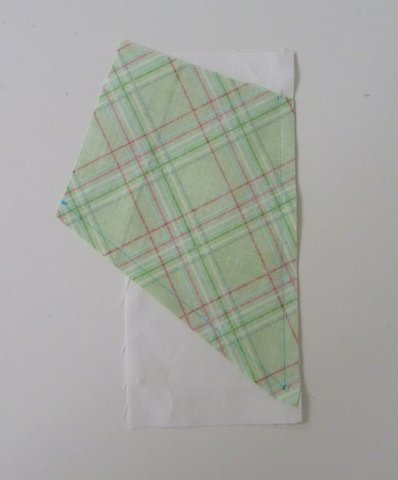
Find the angled lines on your quilting ruler marked 30/60 degrees. Line one up on your strips (as seen above) to cut your triangles.

 cut triangle triangles

All in all you’ll need 6 triangles each of A and B and 16 triangles of C.

layout

Next, lay them out in their correct spots. Maybe some of you would prefer to sew them into rows, but I chose to sew them into later triangle clusters in order to better maintain the triangle shapes as well as match up corners, as is seen above.

individual cluster

Taking one cluster, further break down the set so that one triangle is alone and three triangles are in a row on bottom.

right sides

Take two of your bottom triangles and place them right sides together. Sew them together using a ¼” seam allowance. Since 2 out of three edges on each triangle are cut on the bias and therefore are prone to a little stretch, if you don’t have a walking foot take care to allow them to carefully feed through, holding the triangles together, but not stretching them. You may use pins if you’d like, but I personally did not since the triangle sides do not have much length to work with. After each triangle is sewn, press your seams open (if you like to press to the side…just trust me on this one).

triangle of 4

Once all three triangles are sewn into a row for the bottom, take the fourth triangle for the top point. There is no need to trim the dog ears yet, because as you sew the triangles together they are very helpful for matching up corners.

 cluster arrangement

Continue to sew the remaining clusters together and arrange them in two halves. For each halve, sew the clusters together first and save the individual corner triangles for last. Finally, sew both halves together.

 matchup

When sewing your clusters together, you may find it helpful to line up the seams by matching the center triangles together, as is shown above. Pin and sew accordingly.

quarter inch lineup

Now that all of your triangles are sewn together, it’s time to trim. Don’t worry about the measurements; we’ll take care of that in a minute. The important thing right now is to line up your ruler so that there is an allowance for a ¼” seam all the way around the points of your star.

inner star

Once your block is nicely trimmed, it’s time to measure it so you can add your solid border. Mine measured at 6 ¾” x 7 ¾”. At this point I chose to make my border a teensy bit on the large size so I could nicely trim it down to be a perfect 8 ½” square finish (you may prefer to just use the exact dimensions needed, which would be 7/8” x 6 ¾” and 1 3/8” x 8 ½”; please do whatever you feel more comfortable with). So, for my short sides, on top and bottom, I cut two strips from my remaining solid fat quarter (fabric D) measuring 1 ¼” x 6 ¾” and sewed them into place. Next, I cut two strips measuring 1 ¾” x 9 ¼” and sewed them onto the long sides, completing my border.

finished trim

Trim your block into an 8 ½” square, taking care to make sure your borders are even (if your measurements turn out like mine, the top and bottom borders were just a hair over 5/8” and the side borders were 1 1/8”).

finished block 2

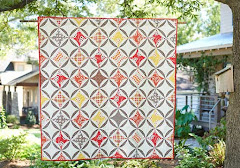
And you’re done! One beautiful triangle star block for your Christmas in July quilt! Now sit back, enjoy a lemonade, and admire your handiwork. Best Blogger TipsShare/Bookmark

Friday, July 27, 2012

Christmas in July Block 13-Freshly Pieced

“Piece of Sky” block by Lee Heinrich

This block’s long and narrow size makes it the perfect canvas for modern design. Partial star shapes and uneven negative space give it movement and make it exciting!

Fabric requirements:
Red print
2 - 4.25” squares

Green print
2 - 4.25” squares
1 - 2.5” square

Red/green print
1 - 2.5” square

Green solid
1 - 2.5” squares

White solid
2 - 4.25” squares
5 – 2.5” squares
5 – 1.5” squares
1 - 1.5” x 3.5” rectangle
1 - 1.5” x 4.5” rectangle
1 - 2.5” x 4.5” rectangle
1 - 2.5” x 5.5” rectangle

To make the large star:
1. Pair up your 4.25” squares as shown—white with red print, white with green print, and red print with green print. Pair them with right sides facing.


2. Sew around the perimeter of each pair of squares, stitching ¼” from the raw edges.


3. Cut your sewn squares in half on the diagonal, and in half on the diagonal again, to make 4 quarter squares, as shown.


4. You will now have four half-square triangles (HSTs) for each pair of sewn squares (12 total). Press your HSTs open. I pressed my seam allowances to the side, pressing toward the red print when there was a red print, and toward the white solid when there was not. Trim each HST to 2.5” square, lining up the bias seam with the 45-degree line on your cutting board.


5. Arrange your HSTs as shown, and piece together. (You will have two unused HSTs left over.)


6. Trim your star to 5.5” inches wide, cutting from the right-hand side of the star.


To make the small stars:
1. Pair the green print 2.5” square and two of the solid green 2.5” squares with solid white 2.5” squares.


2. Follow steps 2-4 above to make the HSTs, using a very scant ¼” seam. You will end up with 12 1.5” HSTs—these little guys shouldn’t even need to be trimmed!
3. Piece the complete small star as shown, with the red/green print 2.5” square as the center, and the solid green/white HSTs as the star points.


4. Piece the partial small star as shown, with the solid green 2.5” square as the center, and the green print/white HSTs as the star points. You will only use four star points, to the left and bottom of the center.


Assemble the block: 1. Arrange your completed stars and white rectangles as shown and piece together.


2. Your completed block should measure 5.5” by 18.5” inches. Enjoy!

Best Blogger TipsShare/Bookmark

Thursday, July 26, 2012

Drum roll please . . . winners of Jane Sassaman's book announced

Sassaman fabric samples


We loved your comments about your recipes for quilting.  The winner's of Jane Sassaman's new book  Patchwork Sassaman Style, Recipes for Dazzling Quilts along with six, 1 yard cuts of Jane's FreeSpirit fabric Early Birds, are Carrie P. and P. Piche.  Congratulations!  Best Blogger TipsShare/Bookmark

Wednesday, July 25, 2012

Christmas in July Block 12-Kimberly at Fat Quarter Shop


Kimberly at Fat Quarter Shop is bringing you block 12! For this one just click on the PDF sheet below and the directions will come right up. Enjoy!

Best Blogger TipsShare/Bookmark

Monday, July 23, 2012

Jane Sassaman's new book gives you recipes for quilt fun and success!


Award-winning designer Jane Sassaman just introduced a new book entitled Patchwork Sassaman Style, Recipes for Dazzling Quilts. She shares with you 20 ‘recipes’ of different techniques to make beautiful quilts that look complex but are truly very simple in origin. This new book is available now at your local retailer. 

Jane, who designs fabric for FreeSpirit, is excited to share with you beautiful quilting ideas for her yummy fabrics.  In true Jane fashion, she uses basic blocks and minimal piecing, sharing with you her innovative process of selecting and combining colors and prints. Everybody—from beginning stitcher to advanced quilter—can create dazzling quilt designs. She offers her true recipe for quilting success.
According to Jane, "Designing the fabric is only half the fun. Sharing with you my 'recipes' for easily turning fabric into quilts for you and your family and friends to enjoy makes my heart smile.  I love sharing the fabric's potential with all of you!"

Do you have a quilt recipe you would like to share? It is a particular way you combine fabrics, a favorite quilt pattern or maybe one of Jane's patterns. Post you comments here by July 25 and we will randomly select two commentators to win Jane's new book and perhaps a bit of fabric too.  Get in on the fun and share you best quilt recipe now!


 Best Blogger TipsShare/Bookmark

Christmas in July Block 10 & 11-Kristy Daum

Today is a double dose of blocks so grab that rotary cutter and get ready!

Designer: Kristy Daum
BLOCK 10


Hi, Kristy here from St. Louis Folk Victorian . I’m excited to be sharing this tutorial with you as part of Christmas in July Block-A-Thon. This block goes together very quickly and works best with small scale prints and solids. It measures 6 ½” x 6 ½” and will finish at 6” square.

Cutting Instructions: I used 4 different fabrics and have labeled them A, B, C and D. The illustration below shows you color placement and assists with cutting and layout.

Pull Fabric A (Red) and cut the following ---

• Qty 2: 3 ½” x 1 ¼” (Marked A1 and A2)

• Qty 5: 2” x 1 ¼” (Marked A3, A4, A5, A6 and A7)

• Qty 1: 2 ¾” x 1 ¼” (Marked A8)

Pull Fabric B (White) and cut the following pieces ---

• Qty 1: 2” x 2” (Marked B1)

• Qty 2: 3 ½” x 1 ¼” (Marked B2 and B4)

• Qty 2: 2” x 1 ¼” (Marked B3 and B5)

Pull Fabric C (Dark Green) and cut the following pieces ---

• Qty 3: 2” x 2” (Marked C1, C2 and C3)

Pull Fabric D (Light Green) and cut the following ---

• Qty 3: 3 ½” x 1 ¼” (Marked D1, D2 and D4)

• Qty 1: 2 ¾” x 1 ¼” (Marked D3)


Assembly Instructions: Before we get started, please make sure that you are piecing with a scant ¼” seam allowance and Press after each seam. Now, let’s start our assembly by breaking the block into four Quarters as identified by Top Left, Top Right, Bottom Left and Bottom Right.
-------------------------------

Step 1: Top Left

• Sew A3 and A4 to center B1.

• Sew A1 to the top of your piecing and A2 to the bottom

--------------------------------

Step 2: Top Right

• Sew A5 to the right of C1

• Sew B3 to the right of your piecing

• Sew B2 to the top and D1 to the bottom

--------------------------------

Step 3: Bottom Left

• Sew A6 to the bottom of C2

• Sew B5 to the bottom of your piecing

• Sew B4 to the left and D2 to the right

----------------------------------

Step 4: Bottom Right

• Sew A7 to the bottom of C3

• Sew A8 to the right of your piecing, then D3 to the right of it

• Finish the quarter by sewing D4 to the bottom

-----------------------------------

Step 5: When you have completed each of your Quarters, it’s time to sew them together.

• Sew Top Left to Top Right, press seam

• Sew Bottom Left to Bottom Right, press seam

• The moment has now come to sew the Top piecing to the Bottom piecing matching that center seam

BLOCK 11

Designer: Kristy Daum


This block measures 12 ½” x 18 ½” and will finish at 12 x 18 inches.

Cutting Instructions: I used 4 different fabrics as seen in the illustration below.


Pull Fabric A (White) and cut the following ---

• Qty 4: 3 ½” x 3 ½”

• Qty 4: 4” x 4”

Pull Fabric B (Grey) and cut the following ---

• Qty 2: 3 ½” x 6 ½”

Pull Fabric C (Red) and cut the following ---

• Qty 2: 3 ½” x 6 ½”

• Qty 2: 4” x 4”

Pull Fabric D (Green) and cut the following ---

• Qty 2: 3 ½” x 6 ½”

• Qty 2: 4” x 4”

Assembly Instructions: Before we get started, please make sure that you are piecing with a scant ¼” seam allowance and Press after each seam.
-------------------------------

Step 1: Section 1


• Sew a 3 ½” x 3 ½” (white) piece to both sides of a 3 ½” x 6 ½” (grey) piece

• Press seams and put this section aside

• Grab your 2nd 3 ½” x 6 ½” (grey) piece and sew the remaining two 3 ½” x 3 ½” (white) pieces to both sides

• Press seams and put this section aside
--------------------------------
Step 2: Making HST
• Grab one of your 4” x 4” (white) pieces and one of your 4” x 4” (red) pieces

• Place them on top of one another, right sides together.

• Draw a diagonal line and sew a scant ¼” seam on both sides of the drawn line

• Cut on the drawn line, and you’ll notice that you have now created two HST (Half Square Triangles)

• Press the seam open or to the darker fabric

• Trim the block to a 3 ½” x 3 ½” square

• Repeat the above directions for the other 4” x 4” (red) block set…when completed you’ll end up with 4 Red/White HST

• Repeat the above directions with the remaining 4” x 4” (white) pieces mixed with the 4” x 4” (green) pieces
--------------------------------
Step 3: Section 2


• You will now be assembling your pieces as shown above

• Sew a (red) HST to either side of your (red) 3 ½” x 6 ½” piece

• Press seams

• Repeat for the other (red) HST and (red) 3 ½” x 6 ½” piece

• Repeat the above steps with the (green) HST and (green) 3 ½” x 6 ½” pieces

• Most importantly, make sure HST are facing in the correct direction (as shown above)

----------------------------------

Step 4: Final Piecing
• Layout all of your sections similar to the illustration above

• Sew each section to the next, making sure to match seams

• Press

• You have now completed your block…give yourself a Round of Applause! Best Blogger TipsShare/Bookmark

Friday, July 20, 2012

Christmas in July Block 9-Quilt Jane

Starific Block

Jane Shallala Davidson
Finished block 18”


Requirements:
5 – Fat Quarters (approx. 18” x 22” pieces)
• 1 x White Solid
• 1 x Green Solid
• 2 x Light Green Prints
• 1 x red print


Cutting:
From the white solid cut:
• 8 rectangles 3 “ x 6 ½”
• 8 rectangles 2 ½” x 6 ½”
From the green solid cut:
• 16 rectangles 2 ½” x 6 ½”
From each of the light green prints cut:
• 4 squares 5” x 5” to yield 8 x 5” squares
From the red print cut:
• 8 squares 5” x 5”

Assembly
For this block make:
4 – Block A
8 – Block B1
4 – Block B2


Block A


• On the wrong side of a 5” square mark 3” from one corner on each side and make a dot ¼” inside from the opposite corner
• Draw 2 lines meeting at the point on the opposite corner to form a kite shape

• Trim ¼” from pencil line

• Place 1 - 3” x 6 ½: rectangle right sides together matching the edge of the ‘kite’.
• Sew along pencil line


• Press seams to one side
• Repeat for opposite side.


• Trim back to 5” square. Position the 45 degree angle of the square ruler down the centre of the points of the kite. Leave ¼” at bottom point of kite. Kite tips should line up with 3” mark on the ruler.
Block B (B1 and B2)

• On the wrong side of a 5” square mark 2 1/2” from one corner on each side and make a dot ¼” inside from the opposite corner
• Draw 2 lines meeting at the point on the opposite corner to form a kite shape
• Trim ¼” from pencil line Place 1 - 3” x 6 ½: rectangle right sides together matching the edge of the ‘kite’.
• Sew along pencil line Press seams to one side
• Repeat for opposite side.
• Trim back to 5” square. Position the 45 degree angle of the square ruler down the centre of the points of the kite. Leave ¼” at bottom point of kite. Kite tips should line up with 2 1/2” mark on the ruler.

Make 8 – B1 (Red print squares, green solid rectangle)
Make 4 – B2 (Light Green print square, white solid rectangle)
• Layout blocks using, diagram 1 as a guideline

• Sew together pressing seams open or in a direction where there is less bulk Best Blogger TipsShare/Bookmark